This post is dedicated to the 10-years-younger version of myself when I was trying to put a photo album on my website and didn't have an efficient way to resize all my images and make thumbnails. I think I opened them all up in photoshop and developed a fairly quick and repeatable sequence of clicks and key presses to manually resize each image. Basically, I'd go into mechanical robot mode, even though I was using a computer capable of automating all that for me.
These days, if you search 'batch image resize', you'll find a bunch of pointy-clicky software that will do the job. But I'm going to talk about the command line approach, since most of those programs are just awkward GUIs wrapped around this library anyway.
Behold: ImageMagick! (http://www.imagemagick.org/)
Perfect for the teen with the website photo album, perfect for the grad student who deals with a ton of images and photos.
First: Get it installed. This part is probably the trickiest, and other places on the internet can tell you how it's done. Essentially, you can download an installer for any operating system, though you might have to figure out how to change a 'path' or two so your computer knows where to find imagemagick. I believe imagemagick is sexiest when used on linux or mac. I might have tried to get it through cygwin back in my windows days. If you get it through cygwin, you can just check the cygwin install box that says you want imagemagick included. Once it's installed, it's not a program that you launch so much as a COMMAND LINE TOOL that you run with a few sensible arguments that super-easily gets what you want done.

Try typing 'convert'.
You don't actually type or run imagemagick anymore, that's just what's responsible for making the 'convert' command available. If it spews a bunch of text about which version, how to use, etc, that's great! That's the documentation that you can look through later to find all the magical things that imagemagick is actually capable of.
Now for some examples of what I often use the 'convert' command for:
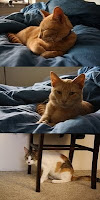
Resizing a single image:
 Here's an image of the 3 different sizes of the photo of my cat!
Resizing multiple images:
I have 3 images now of my cats. I want to make thumbnails of each of them. I COULD type out:
OR I could type this magical bash for-loop:
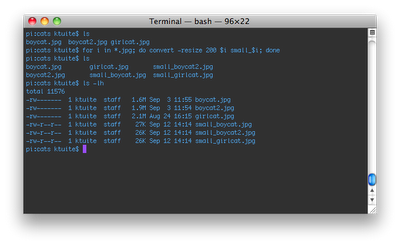
You can see that there are now 2 versions of each image and that the "small_" ones are much smaller in filesize!
Converting between image types:
This is so ridiculously easy. You want to make one of your .jpg photos into a .png?
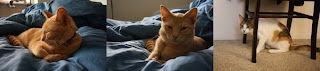
Combining several images into a single image:
Sometimes I need to stick a few images together for whatever reason.
There are 6 images in my folder of cat images right now (3 original-sized and 3 smaller ones from the multiple resize command), and I only want to use the 3 small ones. To do so, I use this command:
convert -append small_*.jpg catstrip.jpg
That makes the image form a tall column, like from a photo booth. It turns out that to make a horizontal montage, change -append to +append!
convert +append small_*.jpg catstrip2.jpg
There! Cute cats and some useful image-manipulation tidbits. Find out all the other cool stuff you can do with 'convert' here: http://www.imagemagick.org/script/convert.php
These days, if you search 'batch image resize', you'll find a bunch of pointy-clicky software that will do the job. But I'm going to talk about the command line approach, since most of those programs are just awkward GUIs wrapped around this library anyway.
Behold: ImageMagick! (http://www.imagemagick.org/)
Perfect for the teen with the website photo album, perfect for the grad student who deals with a ton of images and photos.
First: Get it installed. This part is probably the trickiest, and other places on the internet can tell you how it's done. Essentially, you can download an installer for any operating system, though you might have to figure out how to change a 'path' or two so your computer knows where to find imagemagick. I believe imagemagick is sexiest when used on linux or mac. I might have tried to get it through cygwin back in my windows days. If you get it through cygwin, you can just check the cygwin install box that says you want imagemagick included. Once it's installed, it's not a program that you launch so much as a COMMAND LINE TOOL that you run with a few sensible arguments that super-easily gets what you want done.

Try typing 'convert'.
You don't actually type or run imagemagick anymore, that's just what's responsible for making the 'convert' command available. If it spews a bunch of text about which version, how to use, etc, that's great! That's the documentation that you can look through later to find all the magical things that imagemagick is actually capable of.
Now for some examples of what I often use the 'convert' command for:
Resizing a single image:
convert -resize 200 boycat.jpg small_boycat.jpg
(this makes the new image 200 pixels wide.) convert -resize x200 boycat.jpg taller_boycat.jpg
(notice the x before the 200. this makes the new image 200 pixels TALL instead.) Here's an image of the 3 different sizes of the photo of my cat!
Resizing multiple images:
I have 3 images now of my cats. I want to make thumbnails of each of them. I COULD type out:
convert -resize 200 boycat.jpg small_boycat.jpg
convert -resize 200 boycat2.jpg small_boycat2.jpg
convert -resize 200 girlcat.jpg small_girlcat.jpg
OR I could type this magical bash for-loop:
for i in *.jpg; do convert -resize 200 $i small_$i; done

You can see that there are now 2 versions of each image and that the "small_" ones are much smaller in filesize!
Converting between image types:
This is so ridiculously easy. You want to make one of your .jpg photos into a .png?
convert small_boycat.jpg small_boycat.png
Combining several images into a single image:
Sometimes I need to stick a few images together for whatever reason.
There are 6 images in my folder of cat images right now (3 original-sized and 3 smaller ones from the multiple resize command), and I only want to use the 3 small ones. To do so, I use this command:
convert -append small_*.jpg catstrip.jpg

That makes the image form a tall column, like from a photo booth. It turns out that to make a horizontal montage, change -append to +append!
convert +append small_*.jpg catstrip2.jpg

There! Cute cats and some useful image-manipulation tidbits. Find out all the other cool stuff you can do with 'convert' here: http://www.imagemagick.org/script/convert.php
Comments
Post a Comment